DIY - Lye Bath and E-Tank


I didn't take many pictures when I originally built these, but I am planning on re-building them to take detailed build photos in the near future. Feel free to Contact Me if you have any questions about your build.
There is inherent risk to any DIY build, especially those involving caustic chemicals and electricity. Follow these guides at your own risk! Use common sense and fully research the safety risks involved with any project before starting!
There is inherent risk to any DIY build, especially those involving caustic chemicals and electricity. Follow these guides at your own risk! Use common sense and fully research the safety risks involved with any project before starting!
DIY: Lye Bath
Note: Caution must be taken when working with lye. Wear heavy duty, long cuffed chemical resistant gloves, eye protection, and avoid any exposed skin on your arms and legs. Click Here to learn more about how to safely work with lye.
Supplies:
- A heavy duty covered plastic tote or bucket. Large enough to completely fit your piece or pieces of cast iron
- Water. Enough to fully cover your piece or pieces of cast iron
- 100% Pure Lye. Between 1/5 - 1/2lb per gallon of water
- A second heavy duty plastic tote or bucket (to trasfer cast iron from the lye bath to the sink or outdoor rinsing area)
- Eye Protection
- Heavy duty Chemical Resistant Gloves
Most online guides for building lye baths recommend using 1/5lb of lye per gallon of water (1:5 ratio). In my experience that is a fairly weak solution. I was not satisfied with the efficacy of my tank at a 1:5 ratio and slowly moved up to a 1:2 ratio which I am very happy with. Your experience may vary, so I'd still recommend starting off at 1:5 and moving up slowly as needed. Other factors, like the ambient temperature where your tank is set up, will help you determine what ratio works best for you.
- First off, find a safe area to set up your lye bath. If you have children or pets in your household you are going to want to find an area that they will not be able to access. Lye works better in a warmer environment, so it is common to set lye baths up outside in a sunny area. I personally have mine set up in my basement, which is not ideal for temperature, but I like that it is out of the way and can be used year round. If you live in a colder climate an outdoor lye bath will only work during the summer.
- Once you have decided on a location, fill your heavy duty tote or bucket with water. Depending on the size of your container you may want to fill it with water in its final location. I used a bucket to carry water down to my basement to fill my totes for my second lye bath.
- Slowly and carefully add the lye to the water. There is a saying: "Always add lye to water! If you add water to lye you'll die" It's not very catchy but it gets the point across
It is not uncommon to use an aquarium heater in a lye bath to increase the temperature and therefore the effectiveness of the lye, but I have not done this so I can't speak to how to go about it or how effective it really is. If I ever do decide to go that route I will post an update.
I decided to go with two smaller lye baths (both contain approximately 5-6 gallons each in 10 gallon totes. Since they are in my basement I wanted to make sure they were small and light enough to be moved around or removed without having to drain them first. In fact I set the first one up in my pantry for a few days before I got annoyed with it being there and was able to very carefully carry it downstairs to the basement with a few skillets inside of it.
You are now ready to strip with lye! Visit the Strip page for full instructions on how to use your lye bath.
DIY: Electrolysis Tank
Note: Always use caution when working with electricity!
Supplies:
- A large heavy duty plastic container. I use a medium sized 20 gallon garbage can
- The size of the container: The tank must be big enough to completely submerge the piece you are stripping with enough room around the edges for your anodes. However, you don't want your anodes too far from the piece you are stripping as the further the distance the less effective they will be
- The shape of your tank: If you are going to use a container that wasn't originally designed to hold gallons of water you may want to wrap a ratchet strap or two around it to give it some additional strength. Round containers will always be better at holding large volumes of water than square or rectangular containers, however a square or rectangular container designed for liquid will work fine.
- Water (enough to completely cover your cast iron)
- Arm & Hammer Washing Soda a.k.a. Sodium Carbonate. About 1tbsp per gallon of water
- Sacrificial Anodes: These should be made of regular steel and have a similar surface area to the piece you are cleaning. Good sources for anodes include old rebar, lawnmower blades, plain steel sheeting, etc.
- Wire to connect your anodes together (if you want to go crazy with it, buy a few sets of cheap harbor freight jumper cables and make a series of short jumpers from them like I did)
- A manual(!) car battery charger. An automatic battery charger will not work. There are not many (if any) new manual chargers on the market, but older manual chargers can still be found for around $20 on craigslist or other online marketplaces. Search for Schumacher brand chargers, many are manual and they work great for this purpose. You are going to want something between 2-10 amps.
- Rebar tie wire to hang your cast iron in the tank
- A 2x4 to hang your cast iron from
When deciding on a container to use for your electrolysis tank there are a few things to keep in mind.
Note: Do not use Sodium Bicarbonate, a.k.a. baking soda. If you cannot find washing soda it is possible to convert Sodium Bicarbonate into Sodium Carbonate by baking it in the oven at 200 degrees for an hour.
Note: There is a seemingly never ending argument on the internet and in cast iron restoration communities about whether or not it is safe to use stainless steel as your sacrificial anode. You will find a lot of arguments on either side. I come down very strongly on the side of do not do it. The science is pretty clear on this one. As the chromium present in stainless steel oxidizes and corrodes it will form hexavalent chromium (chromium 6). Hexavalent chromium, or Hex-Chrome as it is commonly referred, is an incredibly dangerous carcinogen. Some people will argue that hex-chrome cannot be produced at the temperatures in an electrolysis tank. This is not true. Yes, high temperatures can produce hex-chrome, but high temperatures are not required to produce it. Some people will say that the danger is overblown since hex-chrome is not airborne and will be washed off your cast iron prior to cleaning. This is also a terrible idea. Washing hex-chrome down the drain is incredibly dangerous and illegal. And finally, even if you are not worried about the giant tank of hex-chrome contaminated water in your back yard consider that when the water eventually needs to be changed you will have no safe way of disposing of it other than paying a hazardous waste removal service to take it away. Please, do not turn your back yard into a superfund site. It is not worth it to save yourself the trouble of occasionally cleaning your anodes.
Ensure that whatever wire you go with is rated for at least double the load that your charger is rated for.
- Find a safe location for your e-tank. Mine is set up in a screened-in outdoor patio. I like this location as it is protected from the elements while still having sufficient ventilation to prevent hydrogen build up.
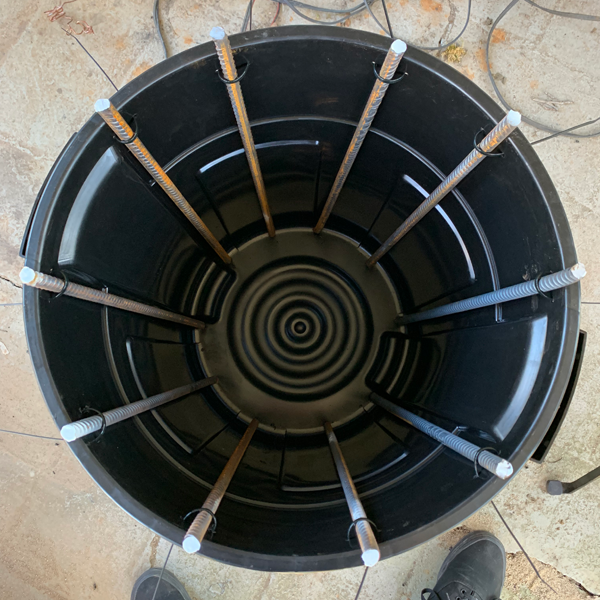
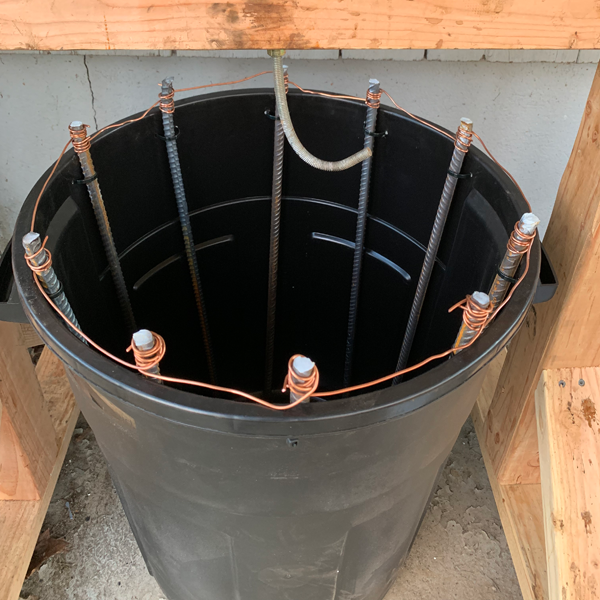
- Mount your anodes to your tank. There are multiple ways to do this, and will depend on both your tank and anode choice. For my tank, since I am using rebar and a garbage can, I marked each anode location and drilled a small hole on either side. I then very loosely zip tied each piece of rebar into place. These zip ties should be VERY loose, just enough to keep the rebar from falling over.
- Attach your anodes together. My first version used stripped solid strand copper wire wrapped around each anode to connect to the next one. This got annoying as they needed to be removed to remove the anodes for cleaning. Harbor freight had jumper cable sets on sale for about $5 each, so for under $30 I was able to make some custom jumpers that can be easily removed and re-attached. If you do go with copper wire do not let it come into contact with the water, it may contaminate your tank and cast iron.
- Add Washing Soda to empty tank (it will dissolve easier that way)
- Add water to tank
- Stir water to help fully dissolve washing soda
- Wrap one end of a length of rebar tie wire around the handle of your cast iron and the other around the 2x4
- Rest the 2x4 across the top of your tank, hanging the cast iron in the electrolyte water. Be sure the cast iron is not touching any of the anodes!
- Attach the leads from your charger. The positive (red) lead attaches to your anodes, the negative (black) lead attaches to your cast iron (or to the rebar tie wire that your cast iron is hanging from). Do not hook these up backwards! Attaching the positive lead to your cast iron will cause it to rust and dissolve!
Note: The process of electrolysis produces hydrogen. Not in particularly large amounts, but enough that you must be careful about where you place your electrolysis tank. Many people set them up in basements or garages and I haven't heard of anybody blowing themselves up yet, but be careful and be sure to have adequate ventilation to prevent hydrogen build-up.
- Electrolysis is largely a line of sight process. When designing and building your tank try to ensure as much "coverage" of your cast iron as possible. Ideally every inch of the piece you are stripping will have a direct line of sight to an anode. This won't be possible for everyone, so if necessary rotate the piece within the tank so that the entire surface has some time directly lined up with your anodes. At a minimum you should have an anode for the front and an anode for the back.
- Be mindful of the temperature of your power supply. These old manual chargers can overheat, especially when using them for something for which they were not designed. On hot days, or if you are running it continuously, consider putting a small fan next to it to help remove the heat that it generates before it damages itself